
Lighting a Surface in Object Graphics
QUESTION: I'm slowly delving my way into object graphics, and I'm having some pretty serious problems with my lighting. Specifically, I have a set of polygons representing an isosurface of a solid. I generated them using shade_volume. When I display them, the view completely lacks definition. When I add lights, very small sections light up, but I can't seem to position the lights to illuminate the whole object. How can I reproduce the lighting model used by polyshade in direct graphics, or at least get enough intensity out of light objects to suit my purposes?
![]()
ANSWER: Yes, lot's of people have trouble with lights the first time they start working with object graphics. The most common problem people have with lighting (aside from no training in the theater arts) is that they forget their lights also need to be scaled, rotated, translated, etc. into the view. You can't just put them anywhere and have them light the scene properly. (Well, you can put them anywhere in object graphics. I guess maybe that is the real problem!)
You will no doubt need several kinds of lights to light your scene properly. But before you think about lights, be sure you have set your surface or polygon object to a white color with the Color=[255,25,255] keyword. I know the documentation says this is the default, but...uh, do it anyway, you will get much better results. :-)
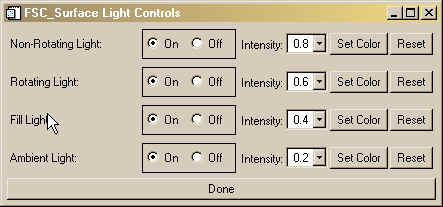
The next thing you will need is an ambient light. This is a light that I like to think of coming from within the object itself. It makes the object glow, if you like. Don't turn the intensity up too high or your other lights won't have much effect and the surface will appear washed out. I would start with an intensity of 0.2 or so.
The next light you need is probably a non-rotating light. I like to have a least one or two lights in non-rotating models so that I can rotate a surface underneath them, and sometimes one or two lights that rotate with the surface to pull out particular surface features.
The final light you might need (especially if you are displaying a surface) is a fill light to shine underneath or on the opposite side of the surface from the side that is drawing all the attention. Otherwise, when you rotate the surface, you won't see anything at all from underneath the surface. I usually rotate the fill light with the surface model, so it always shines underneath the surface as it is rotated.
Here is a section of code from my FSC_Surface program in which I am creating the lights for the surface:
   ; Create some lights to view the surface. Surfaces will look
   ; best if there is some ambient lighting to illuminate them
   ; uniformly, and some positional lights to give the surface
   ; definition. We will create three positional lights: one,
   ; non-rotating light will provide overhead definition. Two
   ; rotating lights will provide specific surface definition.
   ; Lights should be turned off or hidden if elevation shading
   ; is in effect.

       ; First create the ambient light. Don't turn it on too much,
       ; or the surface will appear washed out.

   ambientLight = Obj_New('IDLgrLight', Type=0, Intensity=0.2, Hide=Keyword_Set(elevation))
   thisModel->Add, ambientLight

       ; Shaded surfaces will not look shaded unless there is a
       ; positional light source to give the surface edges definition.
       ; This light will rotate with the surface.

   rotatingLight = Obj_New('IDLgrLight', Type=1, Intensity=0.60, $
       Location=[xrange[1], yrange[1], 4*zrange[1]], $
       Direction=[xrange[0], yrange[0], zrange[0]], Hide=Keyword_Set(elevation))
   thisModel->Add, rotatingLight

       ; Create a fill light source so you can see the underside
       ; of the surface. Otherwise, just the top surface will be visible.
       ; This light will also rotate with the surface.

   fillLight = Obj_New('IDLgrLight', Type=1, Intensity=0.4, $
      Location=[(xrange[1]-xrange[0])/2.0, (yrange[1]-yrange[0])/2.0, -2*Abs(zrange[0])], $
      Direction=[(xrange[1]-xrange[0])/2.0, (yrange[1]-yrange[0])/2.0, zrange[1]], $
      Hide=Keyword_Set(elevation))
   thisModel->Add, fillLight

       ; Create a non-rotating overhead side light.

   nonrotatingLight = Obj_New('IDLgrLight', Type=1, Intensity=0.8, $
       Location=[-xrange[1], (yrange[1]-yrange[0])/2.0, 4*zrange[1]], $
       Direction=[xrange[1], (yrange[1]-yrange[0])/2.0, zrange[0]], $
       Hide=Keyword_Set(elevation))
   nonrotatingModel = Obj_New('IDLgrModel')
   nonrotatingModel->Add, nonrotatingLight

      ; Be sure to add the non-rotating model to the view, or it won't be visualized.

   thisView->Add, nonrotatingModel

       ; Scale the light sources.

   rotatingLight->SetProperty, XCoord_Conv=xs, YCoord_Conv=ys, ZCoord_Conv=zs
   fillLight->SetProperty, XCoord_Conv=xs, YCoord_Conv=ys, ZCoord_Conv=zs
   nonrotatingLight->SetProperty, XCoord_Conv=xs, YCoord_Conv=ys, ZCoord_Conv=zs

       ; Rotate the non-rotating model to the standard surface view.

   nonrotatingModel->Rotate,[1,0,0], -90  ; To get the Z-axis vertical.
   nonrotatingModel->Rotate,[0,1,0],  30  ; Rotate it slightly to the right.
   nonrotatingModel->Rotate,[1,0,0],  30  ; Rotate it down slightly.
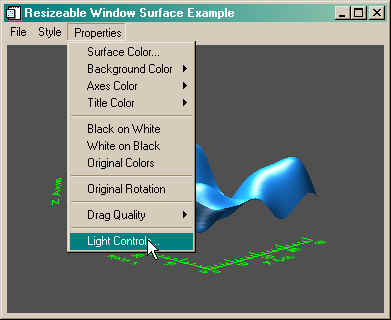
If you download the FSC_Surface program, you can play with the lighting effects. You will find a "Light Control" button under the Properties menu. Here you can experiment with the four lights used in this program by turning the lights on and off, or by changing the intensity and/or color of the lights. By playing around a bit, you will begin to see how each light plays its part in lighting the entire scene.
The illustration below shows the FSC_Surface program with a blue surface and white lights set in their default configuration. Play with the lights to see how colors and intensities will change the final result.
![]()
Copyright © 1997-2003 David W. Fanning
Last Updated 3 January 2003