
Producing a PostScript Preview Image
QUESTION: How can I create a PostScript preview image for my encapsulated PostScript output? I want to be able to see the graphic when I import the PostScript file into my Microsoft Word document.
![]()
ANSWER: Yes, you and everyone else! :-)
IDL Method
According to the IDL 5.2 release notes a real preview image was suppose to be added to encapsulated PostScript files for both Windows and Macintosh computers by setting the Preview keyword on the Device command equal to 2. Alas, it was not to be. However, this feature has been fixed in IDL 5.2.1, which is the current version of IDL at the time this article was written.
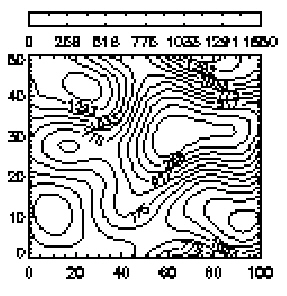
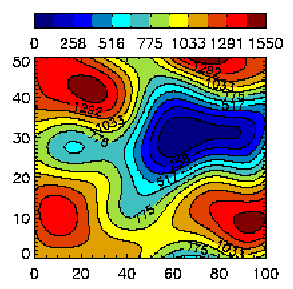
Unfortunately, although you do get a preview image, it is not very good. Here is the preview image I obtained of a colored contour plot and a colorbar. I loaded the encapsulated PostScript file into both Microsoft Windows 97 and Framemaker 5.5 and obtained identical results. The command I used to create the encapsulated PostScript file is this:
   Device, Filename='contour.eps', XSize=3, YSize=3, Inches=1, Color=1, $
	Bits_Per_Pixel=8, Preview=2, Encapsulated=1
The preview image looks like this.
![]()
GSview Method
Another approach has been worked out by Liam Gumley (Liam.Gumley@ssec.wisc.edu), who offers the IDL newsgroup this set of instructions for how he adds a preview to his IDL PostScript output using the freeware program GSView. (GSView is a Windows GUI for Ghostscript, available on many different computer architectures. Something very similar to this may also be possible in Ghostview, the UNIX GUI for Ghostscript.)
Step One
"Create the graphic in IDL. (This example requires TVImage and Aspect.)"
   ;- Create a color image in Postscript.

   Set_Plot, 'PS'
   Device, /Helvetica, /Color, Bits_per_Pixel=8, File='image.ps'
   LoadCT, 39
   !P.Font = 0   ; Hardware fonts.
   pos = Aspect(1.0)
   TVImage, BytScl(Dist(256), Top=!D.Table_Size-1), Position=pos
   Plot, [0], /NoData, Title='My Image in IDL', Position=pos, /NoErase
   Device, /Close_File
Step Two
"Start GSView and do the following:"
- File, Open, (select 'image.ps')
- File, PS to EPS, Yes (Check 'Automatically calculate Bounding Box') Save the file as 'image.tmp'
- File, Close
- File, Open, (select 'image.tmp')
- Options, (select 'EPS Clip')
- Edit, Add EPS Preview, Windows Metafile. Save the file as 'image.eps'
Step Three
"Start Microsoft Word (or whatever your word processing software is). I use Word97."
- Insert, Picture, From File (select 'image.eps')
"You should see a color preview of the image on-screen. If you print to a Postscript printer, you will get the Postcript version of the graphic. If you print to a non-Postscript printer, you will get the preview version of the graphic."
I found this method to be fairly easy to follow. However, when I tried to open the encapsulated PostScript file in Framemaker 5.5, it complained that it couldn't display the preview properly and put up the usual gray box, which is common with encapsulated PostScript files without previews. I had no problem at all displaying the preview image in Microsoft Word 97.
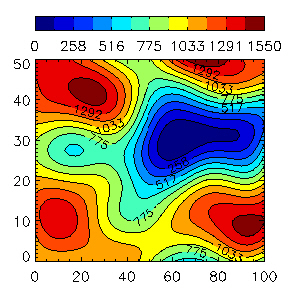
When I modified Liam's method slightly and added a TIFF preview image in Step 2 instead of a Windows Metafile, the preview image displayed beautifully in both Framemaker and Microsoft Word. Here is what the preview looked like with a TIFF preview image.
![]()
Epstool Method
Another, similar method, was offered by Mark Hadfield (m.hadfield@niwa.cri.nz) using the program Epstool.
Epstool is a command-line program written by Russell Lang, the author of GSview. It is designed primarily for adding bitmap previews to EPS files, whereas GSview can also be used to view and print Postscript files. The procedure for adding a preview with Epstool is as follows:
To install epstool, first install Ghostscript and GSview. Then extract epstool.exe from the epstool distribution, put it in whatever directory you like and add this directory to your Windows search path. When it runs, epstool calls on the Ghostscript interpreter, gswin32c.exe, so add the Ghsotscript directory to your Windows search path also.
Step One
Create a PostScript file in IDL. For the example below I used similar code to the GSview method. The device command in this case should turn Encapsulated mode on and Preview mode off.
IDL> Device, /Encapsulated, Preview=0, /Color, Bits_per_Pixel=8, File='image.eps'
Step Two
Start a command prompt, switch to the directory containing image.eps and enter a command like the following:
epstool -zbmp256 -r72 -t6p -o"image+preview.eps" "image.eps"
Step Three
Import the encapsulated PostScript with preview file into your word processing document. Here's what it looks like:
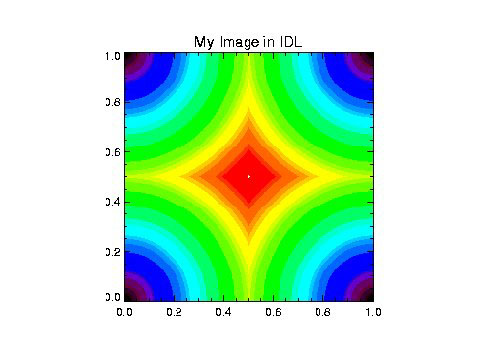
The various switches for the epstool command let you control the preview image. The -z switch specifies the Ghostscript device used to generate the bitmap. Possible settings are bmpmono (the default) for a monochrome preview, bmp16 for 16 colors, bmp256 for 256 colors and bmp16m for 16 million colors. The -r switch specifies the resolution in dpi. The -t6p switch in the command above specifies that the preview image is to be save in "TIFF6 packbits" format. Other possibilities are Windows metafile format (-w switch) and various other TIFF variants. The -o switch specifies the output file name, which must be different from the input file name.
The resolution, color depth and foirmat affect the size of the output file. Here are some file sizes I got for different settings.
| File sizes | |
|---|---|
| No preview | 136 KB | Color depth |
| -zbmpmono -r72 -t6p | 143 KB |
| -zbmp16 -r72 -t6p | 182 KB! |
| -zbmp256 -r72 -t6p | 158 KB |
| -zbmp16m -r72 -t6p | 332 KB | Resolution |
| -zbmp256 -r36 -t6p | 147 KB |
| -zbmp256 -r72 -t6p | 158 KB |
| -zbmp256 -r144 -t6p | 182 KB | Image format |
| -zbmp256 -r72 -t6p | 158 KB |
| -zbmp256 -r72 -w | 317 KB |
| -zbmp256 -r72 -t6u | 316 KB |
This confirms that the settings used above (-zbmp256 -r72 -t6p) give a reasonable-looking preview with only a modest increase in file size. The file size for the bmp16 device is anomalously large, so this device should be avoided. The -w (Windows metafile) and -t6u (TIFF 6 uncompressed) formats are uncompressed and so give much larger file sizes than -t6p.
![]()
Acrobat Method
Still another method was suggested to me by Larry Ashim (ashim@arete.com). This method takes advantage of the Adobe Acrobat program, which is a commonly available commercial software package. The two pieces of Acrobat you need to make this method work are Adobe Distiller, which creates a PDF file from a PostScript file, and Adobe Exchange, which can create an encapsulated PostScript file with a preview image.
I used Adobe Acrobat 3.1 in this example. But before you can do this, you must obtain a PostScript to Encapsulated Postscript plug-in, which is available for free on the Adobe Acrobat web page.
Once you get to the page, you want to download the Export PS 1.2d Plug-in. While you are there, grap the Super Crop Plug-in (32-bit) for Windows 98 and Windows NT machines. This plug-in is not required, but it makes cropping the graphic much, much easier and you will want to have it.
The two files you just downloaded come as self-extracting data archives of zip files. Unzip the files and place the resulting plug-in files (they have *.api extensions) in the Acrobat Exchange plug-ins subdirectory. Now you are set to go.
Step One
Create a PostScript file in IDL. Take care that you do not have either the Preview or Encapsulated keyword set for the PostScript device when you create the PostScript file, or the Distiller will not be able to produce a PDF file in the next step. And what is worse, it won't tell you why it fails! The command I used to set up the PostScript device in this example explicitly turns the preview and encapsulation modes off.
   IDL> Set_Plot, 'PS'
   IDL> Device, Filename='contour.ps', XSize=3, YSize=3, $
	Inches=1, Color=1, Bits_per_Pixel=8, Encapsulated=0, Preview=0
Step Two
Use Acrobat Distiller to distill the PostScript file into a PDF file. I called the Acrobat Distiller directly from within IDL on my Windows NT machine, but you can start it up however you like.
IDL> Spawn, 'Start C:/"Program Files"/Adobe/Distillr/Acrodist.exe'
Save the file with a *.pdf extension.
Step Three
Open up Acrobat Exchange and crop the region you want to save as a graphic. Use the Super Crop plug-in under the Tools menu if you downloaded it. Otherwise, just use the normal cropping tools available in Exchange.
I called Acrobat Exchange directly from within IDL, like this:
IDL> Spawn, 'Start C:/"Program Files"/Adobe/Exchange/acroex32.exe'
Step Four
In Acrobat Exchange choose the Export item from the File menu. Under the Export item, choose the PostScript or EPS selection. You must have the Export PS plug-in for this choice to be available. This selection will pull up a new dialog, which looks like this:
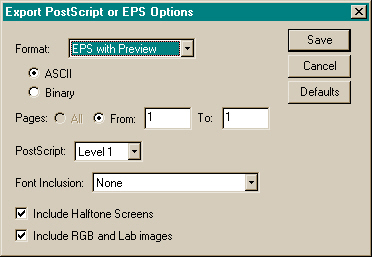
If you have a color image, be sure to select the Include RGB and Lab images selection box. Also change the Format field from "PostScript" to "EPS with Preview". Notice you can change other characteristics of the resulting PostScript file too. I left the other choices in their default state for this example. Save the file with an *.eps extension.
Step Five
Import the encapsulated PostScript with preview file into your word processing document. I had no difficulty importing the file into either Framemaker 5.5 or Microsoft Word 97. Here is what it looked like.
![]()
Copyright © 1999 David W. Fanning
Last Updated 23 November 1999