
Cascading Menu Windows
QUESTION: I understand how to create a series of pull-down menu items with choices for my user, but that is not what I want. I would like to click on a button in one window and have another window appear with more choices for the user, etc. In other words, I would like to have a cascading series of windows appear, each of which has choices for the user. Can such a thing be done in IDL?
![]()
ANSWER: Yes, of course. You can do anything in IDL. :-)
There are a couple of tricks you need to know to do this properly. First, because the info structure (which holds all the information your program needs to run) is going to be passed around among several top-level base widgets, it is best to make this a pointer. This light-weight token is easily passed around, and you are assured that each top-level base has access to the latest and greatest information. Second, it is important to write your cascading windows in such as way that you don't get a new window every time you click a button. You want to be sure there is only one window with the specific choices you wish to give the user on the display at once.
Let's start by writing the widget definition module for the initial window available to the user. First, we should create and realize the widgets. The code will look like this.
   PRO CascadingMenu

   tlb = Widget_Base(Column=1, XOffset=200, YOffset=200, Title='Cascading Menu')
   button = Widget_Button(tlb, Value='Start by Clicking Me!!', $
      Event_Pro='CascadingMenu_Events', UValue='START')
   button = Widget_Button(tlb, Value='Quit', $
      Event_Pro='CascadingMenu_Events', UValue='QUIT')
   labelbase = Widget_Base(tlb, Row=1, Scr_YSize=40, Base_Align_Center=1)
   label = Widget_Label(labelbase, Value='Your choice is: ')
   choiceID = Widget_Label(labelbase, Value='Currently Unknown', /Dynamic_Resize)

      ; Realize the widgets.

   Widget_Control, tlb, /Realize
Notice that we store a string value in the user value of the buttons. We will use this string value in the event handler module to decide what to do when each button is selected.
The next step is to create the info structure. I don't have much to put in the info structure in this little example program, but most real programs will have a great deal of infomation to store here. Put anything you need to run the program in the info structure. The structure is then stored in a pointer location (with No_Copy to avoid copying the whole thing again), and the pointer is stored in the user value of the top-level base so it can be located easily.
   info = {choiceID: choiceID}
   ptr = Ptr_New(info, /No_Copy)
   Widget_Control, tlb, Set_UValue=ptr
Finally, the program is started by calling XManager.
   XManager, 'CascadingMenu', tlb, /No_Block
   END
Running this code will produce the initial menu window, seen in the figure below.
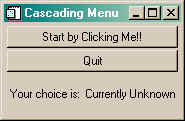
![]()
Creating the Event Handler Module
The next step is to create the event handler module for the program. We have decided to name this CascadingMenu_Events. It will be in here that we create the other menu windows we need and also respond to events from those windows. Notice that in this little program, the only kind of events that can get into our event handler are button events.
Note that if you are writing the event handler module yourself, it should be placed in front of the widget definition module in the program file. The widget definition module should always be the very last program module in the file.
The first thing to do (almost always) in the event handler is get the info structure out of its storage location. While we are doing that we will also get user value of the button that caused the event. We will know by this string which button we are meant to respond to. The code looks like this.
   PRO CascadingMenu_Events, event

   Widget_Control, event.top, Get_UValue=ptr
   Widget_Control, event.id, Get_UValue=buttonUValue
The remainder of the event handler module is simply the case statement that responds to the button user values. Let's write the case in which the user has selected the Start by Clicking Me!! button. The user value for this button is the string "START". The code looks like this.
   CASE buttonUValue OF

      'START': BEGIN

            ; Allow the user to make a selection between Mammals
            ; and Birds from a new menu window.

         IF XRegistered('cascading_choices') EQ  0 THEN BEGIN
            tlb = Widget_Base(Column=1, XOffset=250, YOffset=325, $
               Title='Choose an Animal Group', Scr_XSize=200, $
               UValue=ptr, Group_Leader=event.top)
            button = Widget_Button(tlb, Value='Mammals', $
               Event_Pro='CascadingMenu_Events', UValue='MAMMAL')
            button = Widget_Button(tlb, Value='Birds', $
               Event_Pro='CascadingMenu_Events', UValue='BIRD')
            Widget_Control, tlb, /Realize
            XManager, 'cascading_choices', tlb, /No_Block
         ENDIF
         END
There are a couple of things to notice about this code. First, notice that we are using XRegistered to determine if a window registered with the name "cascading_choices" is already on the display. If it is, this means we already have this window on the display and we can skip the rest of the code in this code block. XRegistered will also force the window forward on the display if it is already there, so the user will notice it.
Next, notice that the code is really a small widget defintion module for the next window we are going to pop up on the display. But, because of the way we are defining event handlers for the buttons, the events for this new widget are going to be handled in this program's event handler module (which we are in the process of writing).
Also, notice that we are storing the pointer in the user value of this top-level base widget, too. Since our event handler expects to find the pointer in the user value of event.top, and since event.top will point to one of several possible widgets that can be on the display simultaneously, we must put the pointer in all of them!
Finally, notice that we are making the group leader of this top-level base the top-level base widget of the window above it in the cascade. This means that we can appropriately destroy any window in the cascade of windows and any windows below it will also be destroyed. Nice. :-)
Great. We are ready now to write the rest of the event handler module. Note that if any of the "selection" buttons are clicked, the name of the selection is written in the very first window of the cascade. The code looks like this.
      'MAMMAL': BEGIN

            ; Allow the user to make a selection of various
            ; mammals from a new menu window.

         IF XRegistered('mammal_choices') EQ  0 THEN BEGIN
            tlb = Widget_Base(Column=1, XOffset=375, YOffset=425, $
               Title='Choose a Mammal', Scr_XSize=200,  $
               UValue=ptr, Group_Leader=(*ptr).choiceID)
            button = Widget_Button(tlb, Value='Cow', $
               Event_Pro='CascadingMenu_Events', UValue='Cow')
            button = Widget_Button(tlb, Value='Coyote', $
               Event_Pro='CascadingMenu_Events', UValue='Coyote')
            Widget_Control, tlb, /Realize
            XManager, 'mammal_choices', tlb, /No_Block
         ENDIF
         END

      'BIRD': BEGIN

            ; Allow the user to make a selection of various
            ; birds from a new menu window.

         IF XRegistered('bird_choices') EQ  0 THEN BEGIN
            tlb = Widget_Base(Column=1, XOffset=125, YOffset=425, $
               Title='Choose a Bird', Scr_XSize=200,  $
               UValue=ptr, Group_Leader=(*ptr).choiceID)
            button = Widget_Button(tlb, Value='Robin', $
               Event_Pro='CascadingMenu_Events', UValue='Robin')
            button = Widget_Button(tlb, Value='Tanager', $
               Event_Pro='CascadingMenu_Events', UValue='Tanager')
            button = Widget_Button(tlb, Value='Woodpecker', $
               Event_Pro='CascadingMenu_Events', UValue='Woodpecker')
            Widget_Control, tlb, /Realize
            XManager, 'bird_choices', tlb, /No_Block
         ENDIF
         END

      'QUIT': Widget_Control, event.top, /Destroy

       ELSE: Widget_Control, (*ptr).choiceID, Set_Value=buttonValue

   ENDCASE

   END
I have provided a complete example of this code. You can see what the final series of menus looks like, with the Coyote button selected, in the figure below.
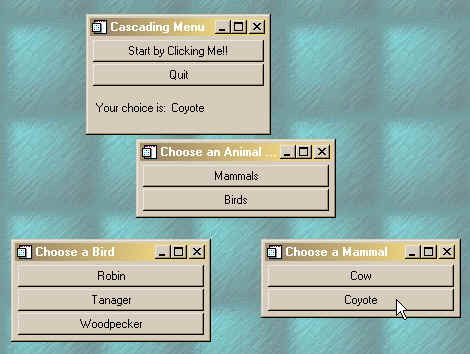
![]()
Copyright © 1997-2003 David W. Fanning
Last Updated 15 May 2003