
Masking an Image with XROI
QUESTION: I have a 2D medical image which has several cold lesions. I want to draw around each of these cold lesions and mask everything inside the region of interest to be zero.
As a self-taught IDL person with limited experience, any example code which will help me achieve my aim would be greatly appreciated.
![]()
ANSWER: There are several ways to draw a free-hand line on an image, but perhaps the best way is to use the XROI tool supplied with IDL. This tool allows you to draw regions of interest (ROI) in a variety of ways. You will probably want to use the pencil tool to draw a free-hand line around your lesions. With XROI you can draw as many ROIs as you like. Notice that when you finish drawing with any of the tools the end point is connected to the start point to form a closed polygon. Each ROI is then stored in the program as an IDLanROI object. For image masking purposes, you want to recover these IDLanROI objects. You can do this with the Regions_Out keyword. Be sure, however, to make the XROI tool a blocking or modal widget. Otherwise, you won't be able to recover the ROIs outside the program. From the IDL command line, you would call the program like this:
   IDL> filename = Filepath(Subdir=['examples','data'], 'mr_knee.dcm')
   IDL> image = Read_DICOM(filename)
   IDL> XROI, image, Regions_Out=thisROI, /Block
The XROI tool will look something like this after you have drawn the region of interest.
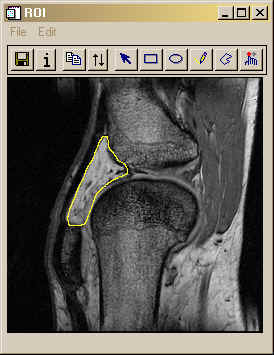
When you are finished, use the Quit button to quit the XROI tool. You can define several ROIs with the tool. If you do, the variable thisROI will be an arrary of IDLanROI objects. In this example, I am going to assume you only defined a single ROI (so I don't have to write a loop).
You can obtain an image mask from the IDLgrROI object that was returned by the XROI tool in the Regions_Out keyword. The Mask_Rule keyword selects all the pixels falling on the ROI boundary and interior to be in the mask. In this case, the ROI pixels are set to 255 in the mask and all other pixels are set to 0.
IDL> mask = thisROI -> ComputeMask(Dimensions=Size(image, /Dimensions), Mask_Rule=2)
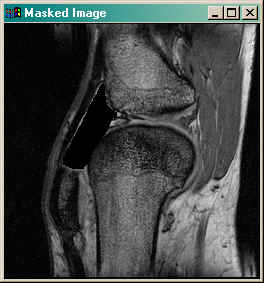
Now you are ready to use the image mask. Suppose, for example, that you want to turn all the pixels inside the ROI to 0 and leave the rest of the image intact. Then you would construct the mask and apply it to the image like this:
   IDL> maskedImage = image * (1 - (mask GT 0))
   IDL> TV, maskedImage
You see the result in the figure below.
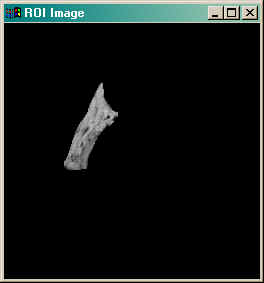
Alternatively, you could mask all of the rest of the image out, and just keep the ROI:
   IDL> roiImage = image * (mask GT 0)
   IDL> TV, roiImage
Here is the result in the figure below.
Because we are working with objects here, it is our responsibilty to destroy them. Otherwise, there is an excellent chance we will have memory leakage in our program. This is extraordinarily important when incorporating code like this into programs. Destroy the object like this:
IDL> Obj_Destroy, thisROI
I have written a slighly more robust program, named ROIMask, which you can use to produce these kinds of image masks with the XROI tool.
   IDL> maskedImage = ROIMask(image, Indices=roiIndices)
   IDL> TV, maskedImage
Once ROIs have been selected, you may want to know more about them. For example, you might what to calculate the boundary and area of the ROI. You could use the ComputeGeometry method to calculate these values.
   IDL> ok = thisROI -> ComputeGeometry(Perimeter=length, Area=area, Centroid=center)
   IDL> Print, 'Length: ', length, '     Area: ', area, '      Center: ', center[0:1]
      Length:        304.40397     Area:        2185.5000      Center:        87.755891       146.79021
![]()
Copyright © 1997-2003 David W. Fanning
Last Updated 14 May 2003