
Outputting Multiple Coyote Graphics Commands


QUESTION: I just discovered your Coyote Graphics routines and I love them. I especially love that you can send the output of a Coyote Graphics command directly to a PNG or JPEG file or even a PostScript file with the Output keyword. Super convenient!
But, what I can't figure out is how to use the Output keyword to send multiple Coyote Graphics commands to a file. For example, I have a line plot and I want to overplot additional information on the plot before I save it. How can I create a PNG file of this multiple command situation? I've tried this, and it just doesn't work.
   data_1 = cgDemoData(17)
   data_2 = cgDemoData(17)
   cgPlot, data_1, Color='red', Output='myplot.png'
   cgOPlot, data_2, LineStyle=2, Color='blu7', Output='myplot.png'
![]()
ANSWER: There are several ways to output multiple Coyote Graphics commands, and which you choose depends on whether you want to see your output on the display. If you just want to create a PNG file or some other type of raster file, then it is probably easiest to use the cgPS_Open/cgPS_Close method.
With this method, you simply bracket your commands with cgPS_Open and cgPS_Close, like this.
   cgPS_Open, 'myplot.ps'
   data_1 = cgDemoData(17)
   data_2 = cgDemoData(17)
   cgPlot, data_1, Color='red'
   cgOPlot, data_2, LineStyle=2, Color='blu7'
   cgPS_Close, /PNG, /Delete_PS
You can use any keyword allowed by cgPS_Open or PSConfig to set up the PostScript file in whatever fashion you like. By default, the PostScript output is configured to match whatever current graphics window you have open.
If I am making output for my web page, I sometimes also find it convenient to set the Width keyword on cgPS_Close to the particular pixel width I prefer (e.g, Width=600).
Here is the PNG file created with the commands above, named myplot.png, with the addition of the Width=400 keyword.
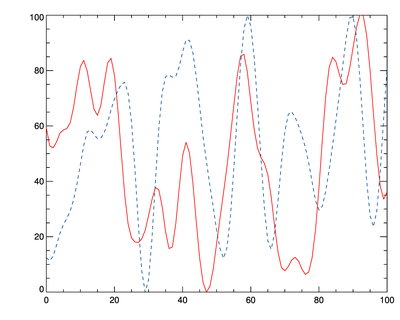 |
| The PNG file created with the commands above. |
Another way to do this is to put the commands into a cgWindow. Then you can programmatically make a PNG file using the Output keyword to cgControl. You have less control over the file this way, since the output will be designed to match whatever is in the cgWindow. You would do it like this.
   data_1 = cgDemoData(17)
   data_2 = cgDemoData(17)
   cgPlot, data_1, Color='red', /Window
   cgOPlot, data_2, LineStyle=2, Color='blu7', /AddCmd
   cgControl, Output='myplot.png'
The advantage of this method, of course, is that you can see the commands and change the size of the window to get the sort of output you want.
A third method is to simply collect all your Coyote Graphics commands in an IDL procedure, and use either of the two methods described above to create the raster file. This is the method used in the Coyote Plot Gallery. It looks like this.
   PRO Main
      data_1 = cgDemoData(17)
      data_2 = cgDemoData(17)
      cgPlot, data_1, Color='red'
      cgOPlot, data_2, LineStyle=2, Color='blu7'
   END

   cgPS_Open, 'myplot_alternative_1.ps'
   Main
   cgPS_Close, /PNG, /Delete_PS

   cgWindow, 'Main'
   cgControl, Output='myplot_alternative_2.png'
![]()
Version of IDL used to prepare this article: IDL 8.2.
![]()
![]()


