
Displaying a Transparent Image
QUESTION: I have a logo in the form of a transparent PNG image that I would like to display in a graphics window. The image itself is dimensioned [4,93,93]. I presume this is a 24-bit image with an alpha channel, but I cannot work out how to display this in IDL direct graphics. (It displays correctly in IDL object graphics, presumably because images in that system are allowed alpha channels.) Can you help?
![]()
ANSWER: You are correct that the extra dimension is an alpha channel. And you are also correct that without some modifications you will not be able to display this image with the TV command. However, all is not hopeless yet.
To see how to do this, I downloaded a transparent PNG image that was provided by Stefan Schneider on a PNG image web page. I saved the image with the name “example.png”, and I read the image into IDL with these commands:
   IDL> image = Read_PNG('example.png')
   IDL> Help, image
   IMAGE           BYTE      = Array[4, 162, 150]
We see this image is a pixel interleaved image with an alpha channel. Images like this are a bit easier to work with in IDL if they are band interleaved, so I converted it to a band interleaved image first.
   IDL> image = Transpose(image, [1,2,0])
   IDL> Help, image
   IMAGE           BYTE      = Array[162, 150, 4]
Your first thought might be that you could just ignore the alpha channel altogether. This was my first thought, too. But the result is unsatisfactory. Considerable detail, for example, is missing from the image. (In the original image from the person who asked this question, the text in the image was unreadable and blurred.) You can see the result in the figure below.
   IDL> Window, XSIZE=162, YSIZE=150
   IDL> TV, image[*,*,0:2], TRUE=3
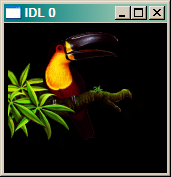 |
| The image without an alpha channel. |
In fact, the alpha channel has information in it that we would like to use. We can have a look at the alpha channel by itself.
   IDL> alpha_channel = image[*,*,3]
   IDL> MinMax, alpha_channel
        0 255
   IDL> TV, alpha_channel
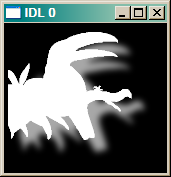 |
| The image alpha channel. |
You see here that the alpha channel of the image is byte scaled into the range 0 to 255. Normally, alpha channels are scaled into the range of 0 to 1, and we will need to scale it into that range if we wish to use it later on. I do so with the cgScaleVector command from the Coyote Library. The alpha channel essentially tells us how to blend the foreground image (the bird, in this case) with the background image (normally the pixels on the display where we are going to place the bird image).
IDL> scaled_alpha = cgScaleVector(alpha_channel , 0.0, 1.0)
We are also going to want to make our alpha image a 24-bit image.
   IDL> s = Size(image[*,*,0:2], /DIMENSIONS)
   IDL> alpha = Rebin(scaled_alpha, s[0], s[1], s[2])
Let's take the first three channels of our image and name that image foregnd. And let's create an all white background image, named backgnd.
   IDL> foregnd = image[*,*,0:2]
   IDL> backgnd = BytArr(s[0], s[1], 3) + 255B
Then the formula we are going to use to create a final image is this:
IDL> final_image = foregnd*alpha + (1 - alpha) * backgnd
And to display the image, we simply use the TV command.
IDL> TV, final_image, TRUE=3
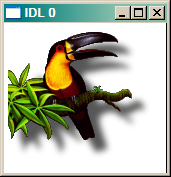 |
| The image with a white background. |
We can use any background color that we like. Suppose we wish to use a pale yellow [240,230,140] background color. We can do this.
   IDL> backgnd = Rebin([ [[240]], [[230]], [[140]] ], s[0], s[1], s[2])
   IDL> TV, foregnd*alpha + (1 - alpha) * backgnd, TRUE=3
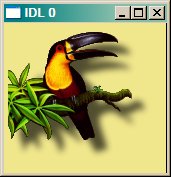 |
| The image with a pale yellow background. |
This suggests a way to place the image onto another image, and use the other images pixels as the background image. We could put this image on a map of Africa, for example.
   IDL> filename = Filepath('africavlc.png', SubDir=['examples', 'data'])
   IDL> africa= Read_PNG(filename, r, g, b)
   IDL> win = Size(africa, /DIMENSIONS)
   IDL> Window, XSIZE=win[0], YSIZE=win[1]
   IDL> TVLCT, r, g, b
   IDL> cgImage, africa, /TV
What we need to do is get a 24-bit image from the location where we want to display the bird image. Suppose we wish to put the bird on this image with the lower-left corner of the image at pixel location [183,338]. Then we could capture a 24-bit image from this location (this assumes you are using a 24-bit graphics card), like this.
IDL> backgnd = TVRD(183, 338, s[0], s[1], TRUE=3)
And we just display the image normally.
IDL> TV, foregnd*alpha + (1 - alpha) * backgnd, TRUE=3, 183, 338
The result is shown below.
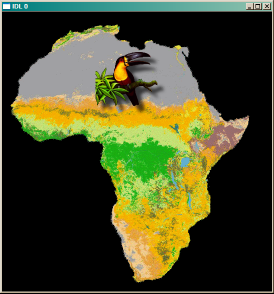 |
| The image on top of another image. |
Update
As of May 15th, 2009 cgImage is now written in such a way that it can display transparent PNG files directly. Just simply pass the transparent PNG file directly to cgImage.
Update
On October 25th, 2012, I introduced a TRANSPARENT keyword to cgImage that will allow any 2D or true-color image to be displayed with transparency. Simply set the keyword to the amount of transparency desired. A MISSING_VALUE can be use to select a color index (in the case of 2D images) or a particular color (in the case of true-color images) to completely knock out and make totally transparent.
   cgImage, cgDemoData(7), CTIndex=0
   cgImage, cgDemoData(5), CTIndex=33, Transparent=50, $
      AlphaFGPosition=[0.25, 0.25, 0.75, 0.75], Missing_Value=0
 |
| Any image can be made transparent with cgImage. |
If I wanted to create this same image in a PostScript file, I would have to supply the background image with the cgImage command. The code to do so might look like this. This code will produce a PostScript file, and a PNG file that is created from the PostScript file. It is the PNG file that is shown in the figure below the code.
   cgDisplay, /Pixmap
   cgImage, cgDemoData(7), CTIndex=0
   bgimage = cgSnapshot()
   WDelete

   cgPS_Open, 'test_output.ps'
   cgDisplay
   cgImage, cgDemoData(7), CTIndex=0
   cgImage, cgDemoData(5), CTIndex=33, Transparent=50, $
      AlphaBackgroundImage=bgimage, $
      AlphaFGPosition=[0.25, 0.25, 0.75, 0.75], Missing_Value=0
   cgPS_Close, /PNG
 |
| Transparency can also be done in PostScript, if the background image is provided. |
Additional details about using transparent image in your programs can be found in the article Creating Transparent Images with cgImage.
![]()
Version of IDL used to prepare this article: IDL 7.0.1.
![]()
![]()
Last Updated: 7 November 2012


