
Coyote Library Program Broken!
QUESTION: The Coyote Library program I downloaded from your web page is not worth what I paid for it. It either won't compile, won't work, or it's clearly broken. Probably all three. What should I do about it? It's pretty clear to me you don't know jack about writing programs. They suck!
![]()
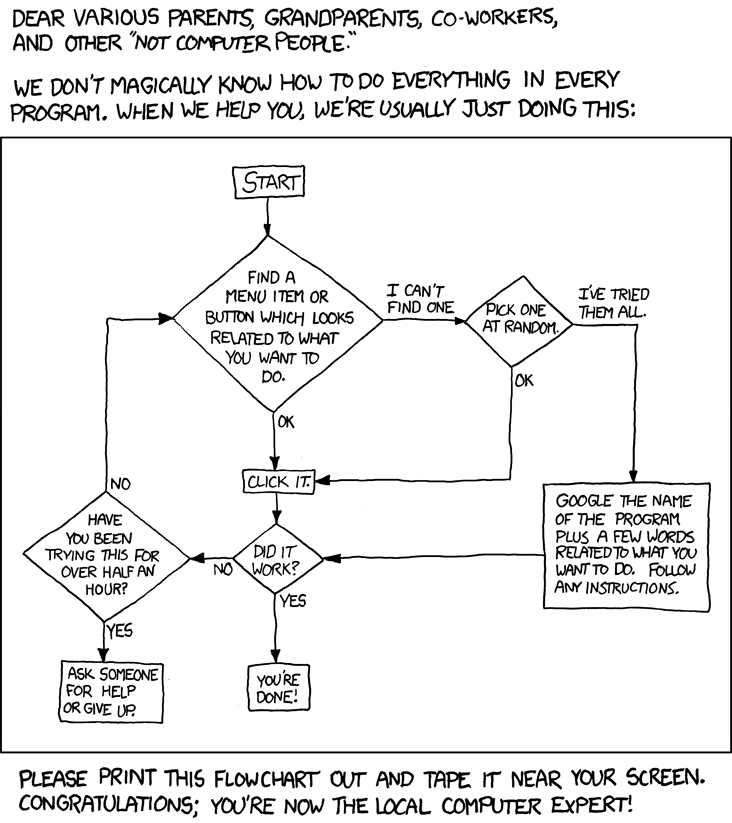
ANSWER: Uh, well, I understand your frustration. But, I can assure you, these programs are suppose to compile and work correctly. Occasionally, Coyote will introduce a boneheaded error, but not too often. There are typically five steps you can take to get your program working. Here is xkcd's take on the overall process we will be following.
![]()
Step 1: Update your Coyote Library now!
If you didn't update your Coyote Library this morning, there is a very good chance your Library is out of date. Please update your Coyote Library now. This will solve 80 percent of the problems that are reported to me.
The best way to keep current is to update from Subversion Code Respository every morning when you start your day. Then you know things will work on your computer exactly as they do on my mine!
If you downloaded a single file from the web page, then this is certainly why it isn't working. Programs from the Library require other programs in the Library. Be sure you download the entire Coyote Library. You can download the Coyote Library either as a zip file from this web page, or you can download the Coyote Library from a Subversion code repository. You must have a Subversion client installed to use the repository code. The Subversion repository is highly recommended as this is the main repository for all the work I do on the Library. You can use the repository to update to the very lastest version of the Library, or to a particular tagged release. The zip file always contains the very latest version of the Library.
Be sure you restart your IDL session after you update your Coyote Library, so you access the new routines.
![]()
Step 2: Make sure the problem program hasn't been retired
It is possible that the routine you are having trouble with has been retired from service. Please check the list of retired programs to see if the problem program is collecting a pension. If it is, simply replace its name in the code with the current version listed next to it, and you are usually good to go. You will need to recompile your program.
An alternative solution is to add the retired program to your IDL path. You can find retired Coyote programs in a zip file. The downside of this solution is that all development and maintenance stops for retired programs. If you want to keep current, and why wouldn't you, since new features and bug fixes occur constantly, you should update your code to use the latest Coyote routine.
![]()
Step 3: Make sure the Coyote Library is on the IDL Path
It does no good to download the Coyote Library unless you put it on your IDL Path. Please follow the directions below for adding the Coyote Library to your IDL Path. Be sure you restart IDL (or type a .Reset command) before you try your program again. If you add the Coyote Library you just updated to the front of your IDL Path, you will have solved 90% of the problems reported to me.
Be sure you restart your IDL session after you update your Coyote Library path, so you access the proper routines.
![]()
Fail Safe Method for Adding Coyote Library to Path
There is one fail safe method to make sure the current Coyote Library directory is found first on your IDL path.
- Start IDL.
- Use the CD command to move to the Coyote Library directory you want to use.
IDL> CD, '/home/idl/coyote'
- Once in the right directory, type "cgAddToPath". The current directory will be
added to the first position in your IDL path. Type "PrintPath" to confirm that
the Coyote Library has been added to your IDL path.
IDL> cgAddToPath IDL> PrintPath
This is a temporary solution and is good for just this one particular IDL session. It does not change your IDL path permanently, as other solutions would.
![]()
Step 4: Make sure you have one Coyote Library on your IDL Path
It is a source of amazement and frustration to me to learn how many old and outdated copies of the Coyote Library can appear on a single IDL path! The record is eight. You may have more than that. You need ONE!
It is possible you may have unknowingly downloaded multiple copies of the Coyote Library. Many people and groups use the Library. Some groups distribute copies (always old copies!) of the Library with their software. If you use the NASA Astronomy Library, the SolarSoft library, and many others, you may have old versions of Coyote Library routines lurking on your computer. Please get rid of them.
How can you find them?
Start by running the Coyote Library routine cgFindCoyoteFiles. It will print out a list of possible directories that have Coyote Library routines in them. Use this list to eliminate all but the one you just downloaded minutes ago.
    IDL> cgFindCoyoteFiles
        The following directories in !PATH probably have Coyote Library routines in them.
             C:\IDL\coyote              C:\IDL\clients\ron\code
If you are still having problems, see if you can discover where IDL is getting the file from. Suppose the program that is causing you grief is cgColor. Try this in a fresh IDL session.
    IDL> .Reset
   IDL> Print, File_Which('cgcolor.pro')         C:\IDL\coyote\cgcolor.pro
Is that pointing to the one Coyote Library directory you now have on your machine? If not, go back to Step 3 and try putting the Coyote Library at the front of your IDL path.
If that doesn't help, start a fresh IDL session (or type a .Reset command) and run the program that is causing you a problem. When it crashes, immediately type the Help command shown below.
   IDL> .Reset   IDL> MyProgram
   CGCOLOR% Color "Opposite" cannot be found.   IDL> Help, /Source
You will see a list of compiled procedures and functions. Look for the name of the program that crashed on the list. Is it pointing to the Coyote Library your just updated moments ago? If not, please return to Step 3 and try putting the Coyote Library at the front of your IDL path.
Completing this step successfully will solve 99 percent of the problems reported to me.
Be sure you restart your IDL session after you update your Coyote Library path, so you access the right routines.
![]()
Step 5: Solving Problems With Raster File Output
Nearly all Coyote Graphics programs create raster file output from PostScript intermediate files, which are passed to ImageMagick to create the raster file. The programs work this way because this is the only way to create professional looking fonts in raster file output using direct graphics routines. If you are having trouble creating raster file output from a Coyote Graphics routine, it is almost always the case that ImageMagick has not been properly installed. Note that we learned recently that ImageMagick had dependencies on Ghostscript, which means that has to be installed, too. There are special considerations for installing ImageMagick on a Macintosh computer.
To test your ImageMagick installation from within IDL, please exit IDL and restart. Then, type this command.
IDL> Print, cgHasImageMagick()
If a 1 was printed, you are good to go. If a 0 was printed, there is still a problem with your ImageMagick installation. Be sure your PATH Environment variable includes the ImageMagick bin directory. You may have to log out and log back in to reset your Environment variables correctly. At the very least, you will have to restart IDL.
Completing this step and getting ImageMagick installed successfully will solve 99.9 percent of the problems reported to me.
![]()
Step 6: Congratulations! It is possible you have discovered a bug!
If you get to this step, it is possible (the chances are about 50-50) you have discovered a bug. In any case, you are probably going to need some help figuring it out. I'm delighted to have you contact me. Please put something like "Stupid IDL Bug" in the Subject line of your e-mail, or it won't make it past my spam filter.
Rest assured, I hate bugs, and I'll get on this ASAP. Most bugs, if they are bugs, are fixed within the hour of me seeing your e-mail. I'll be in touch shortly!
Please note, I will ask you if you have completed Steps 1-5 before I work on the problem, so it would be best for you to do those steps, then tell me about them. The more detail you can provide, the more I will be inclined to believe you. Please don't take my skepticism personally. It's just that I have been doing this job for a long, long time and I know that completing those five steps solves 99.9 percent of of the problems that are reported to me. My wife insists that I be as efficient at providing this free support as I can possibly be. I know you understand!
![]()
Step 7: What!? Still here?
If you are still here, you might need additional help. Please see XKCD's flow chart for solving technical support problems. (XKCD is Coyote's anglo cousin, I think.)
![]()
![]()
Steps for Installing the Coyote Library on Windows
- Download the Coyote Library zip file. You can put the zip file wherever you like on your hard drive. (Note that, if you prefer, you can download the Coyote Library from an open-source Google Code Subversion repository into a directory on your machine using either a Subversion client or Subversion commands directly.)
- Extract the zipped files to a local directory. It is probably not a good idea to extract these
files to the Desktop. It will complicate your life later. On my C: drive on my Windows machine, I have
a top-level directory named idl. This is the directory I would select to receive the extracted coyote directory from the zip file. I am going to use the following directory in my examples
below.
C:\idl\coyote
You should substitute into the commands the actual location where you installed the files.
Installation Alternatives
It would be perfectly fine if you wanted to install the Coyote files in a directory other that the coyote directory described above. You could, for example, install the file into a coyote directory located in the lib directory in the main IDL distribution (probably something like C:\Program Files\ITT\IDL70\lib), if you had permission to do so. Or, you can name the directory something entirely different. It is not important what you name it, but how it is found on your IDL path. - Given that you have extracted the zip file into the directory above, how do you get the files
on your IDL path? There are many possibilities. Let me tell you one I would not recommend.
I do not recommend that you add this directory as a project to your IDL 7.xx Workbench and let IDL manage the path to the files for you. (Adding the files as a project is a great idea, just do not EVER let IDL manage the paths for you.) If you add them to your Workbench as a project be sure go to the Project -> Properties -> IDL Project Properties tab and turn off the button that says “Update IDL path when project is opened or closed.”
If you make the files a project in your IDL Workbench then add the directory to the IDL path by going to the Window -> Preferences -> IDL -> Paths tab. Click the Insert... button and search for the coyote directory. Next, select the coyote directory and use the Move Up button to move the coyote directory in front of (toward the top of the window) of other directories on your path. You should now be good to go. If you still find occasional name conflicts, contact me and I'll see what I can do about it. Some name conflicts are probably inevitable. Play around with the order of your files in this path list until you are happy.
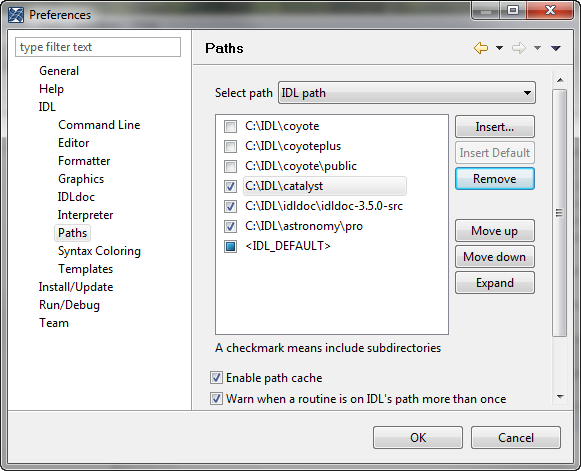
Adding the Coyote Library to your IDL Path. - If you are not using the IDL Workbench to run IDL, you might be able to do something similar to the IDL Workbench instructions if you are using an IDLDE. There the IDL path preferences are probably in File -> Preferences -> Path. The Insert... button is still there, but you need to use the arrow buttons to the right of the path list to move and order the directories on your IDL path.
- If all else fails, you can either include the following IDL command in your
IDL start-up file, or
you can simply type the command at the IDL command line before you run any Coyote program:
IDL> !PATH = Expand_Path('+C:\idl\coyote') + ';' + !PATHNote the plus sign (+) at the front of the coyote directory name. This tells IDL to search all of the sub-directories of these directories and add them to the path, too. Note also that directories are separated by a semi-colon on Windows machines.
![]()
Steps for Installing the Coyote Libray on UNIX
- Download the Coyote Library zip file. You can put the zip file wherever you like on your hard drive.
- Extract the zipped files to a local directory. It is probably not a good
idea to extact these files to your Desktop, as that will complicate things later.
On my local hard drive on my UNIX machine, I have
a directory named /home/david/idl. I would put the contents of the zip file here. I am going to use the following directory in my examples
below.
/home/david/idl/coyote
You should substitute into the commands the actual location where you installed the files.
Installation Alternatives
It would be perfectly fine if you wanted to install the Coyote files in a directory other that the coyote directory described above. You could, for example, install the file into a coyote directory located in the lib directory in the main IDL distribution (probably something like /usr/local/ITT/idl70/lib), if you had permission to do so. Or, you can name the directory something entirely different. It is not important what you name it, but how it is found on your IDL path. - Given that you have extracted the zip file into the directory above, how do you get the files
on your IDL path? There are many possibilities. Let me tell you one I would not recommend.
I do not recommend that you add this directory as a project to your IDL Workbench and let IDL manage the path to the files for you. (Adding the files as a project is a great idea, just do not EVER let IDL manage the paths for you.) If you add them to your Workbench as a project be sure go to the Project -> Properties -> IDL Project Properties tab and turn off the button that says “Update IDL path when project is opened or closed.”
If you make the files a project in your IDL Workbench then add the directory to the IDL path by going to the Window -> Preferences -> IDL -> Paths tab. Click the Insert... button and search for the coyote directory. Next, select the coyote directory and use the Move Up button to move the coyote directory in front of (toward the top of the window) of other directories on your path. You should now be good to go. If you still find occasional name conflicts, contact me and I'll see what I can do about it. Some name conflicts are probably inevitable. Play around with the order of your files in this path list until you are happy.
- If you are not using the IDL Workbench to run IDL, it is more likely that you are defining your
IDL path be defining environment variables in a .cshrc, .bashrc, or .profile file. For
example, in a .bashrc file, you could add the coyote directory to your current IDL path ($IDL_PATH) by adding a command like this:
export IDL_PATH=+/home/david/idl/coyote:$IDL_PATH
Note the plus sign (+) in front of the coyote directory name. This is an indication that IDL should expand this path to include all of the sub-directories under this directory and add these to the IDL path, too.
I typically define my IDL path in an IDL start-up file. The start-up file is also defined by an environment variable ($IDL_STARTUP). For example, in my .profile file I have this line:
export IDL_STARTUP=/home/david/idl/idlstartup.pro
Then, in my IDL start-up file, which is simply a text file that gets executed upon starting up IDL, as if I were typing the commands at the IDL command line, I have the following lines of code which define my IDL path:
    !PATH =  Expand_Path('+~/idl/coyote') + ':' + $
            Expand_Path('+~/idl/catalyst') + ':' + $
            Expand_Path('+~/idl/david') + ':' + $
            Expand_Path('~/idl/idl_util') + ':' + $
            Expand_Path('~/idl/idl_grids') + ':' + $             !PATH
Note the plus sign (+) at the front of the coyote and catalyst directory names. This tells IDL to search all of the sub-directories of these directories and add them to the path, too. Note also that directories are separated by colons in a UNIX environment.
- If all else fails, you can simply type the following IDL command at the IDL command line before you run any Coyote program:
IDL> !PATH = Expand_Path('+~/idl/coyote') + ':' + !PATHNote the plus sign (+) at the front of the coyote directory name. This tells IDL to search all of the sub-directories of these directories and add them to the path, too.
![]()
Version of IDL used to prepare this article: IDL 7.0.1.
![]()
![]()